- Table of contents
- ESP32
ESP32
NOTE the ESP32 interfaces only with 3.3V circuits!
These development boards:- have BOTH wi-fi AND BLE built in. No separate boards are required for networking.
- are typically about $10 each - far less than a traditional official Arduino Uno.
- do NOT have the Uno fornm factor, i.e. they do not directly support the common Arduino shields
- can have header pins added and then be plugged into protoboards. Please do NOT solder to one of these boards!
- are approximately 10x faster than Arduino UNO's
- have many other valuable features for IoT applications
- can also be used for non-IoT applications
Arduino IDE
Using the ESP32 with the Arduino IDE requires first installing the board files.
In the Arduino IDE, go to File -> Preferences
Add this in additional board manager URLS: https://raw.githubusercontent.com/espressif/arduino-esp32/gh-pages/package_esp32_dev_index.json
NOTE - there is an alternate URL pointing to the expressif website to obtain this file. That file may NOT be in sync with the one from github and may be lagging. For example, on 11/30/2021, the JSON from GitHub allowed us to download version 2.0.6 and below of the ESP32 board support while the one from expressif only allowed us to download version 1.0.6. This WILL matter if your goal is to connect to the campus wifi. See below!
Next go to the Tools > Boards > boards manager. Search for ESP32. Install the latest version.
From the list of boards, be sure to select the "ESP32 Dev Module" to match the DevKit boards currently stocked in the Design Lab. If you use any other board, you may have to make a different selection.
ESP-IDF
ALL ESP-IDF RELATED MATERIAL IS STILL UNDER DEVELOPMENT WHILE WE LEARN! Fall 2022
The alternative programming method is to use a programming environment such as Eclipse or VS Code (NOT Visual Studio!) to program using the ESP-IDF (Internet Development Framework) approach. While this is required to get at many of the more advanced features and functions of the ESP32, the majority of Capstone projects do not require this.
ESP-IDF Software
The software is available from the Expressif site: https://dl.espressif.com/dl/esp-idf/
In general, take the most recent "stable" version. For existing projects, you may discover incompatibilities that force you to either make software changes or revert to the previous version. Your team and PE will need to make this decision on a case by case basis.
VS Code
Installation instructions: https://embeddedtutorials.com/eps32/get-started-with-esp-idf-windows/#install-vs-code-espressif-idf-extension
VS Code Workspace (Folder) and Main Program File Name
The workspace name is automatically taken from the folder name. For VS Code, the project path must not exceed 90 characters or contain any white spaces! Don't bury this deep in a folder structure!
If you rename the folder, the workspace name will change. You must manually edit the CMakeLists.txt and the Makefile files in the folder to have the new name.
The main program file name is automatically identified by VS Code during its CMake step. If you change it, you must manually change the main/CMakeLists.txt to use the new file name.h3. Learning Resources for ESP-IDF
Committing Projects to the Repo
The build folder will be very large and should NOT be committed to the repo! On all platforms that have command line subversion installed, the following can be used to tell Subversion to ignore that and some other files that should not be in the repo. These are conveniently defined by VS Code to be in a file called ".gitignore", which provides that function for GIT.
Change to the project folder where the .gitignore file and the build folder can be found and then use:
svn propset svn:ignore -F .gitignore .
- the first time commit
- the files/folders already exist
So that won't work!!! You must use the command line.
VS Code Monitor
Starting the monitor may cause the ESP32 to reboot. It does on a test ESP32 that has an external capacitor across the EN pin and GND Thus you may not have to press the boot button so see the chip's output immediately after a boot. Without the external cap, you will likely have to use the boot button.
ESPConnect
This is a handy tool for gathering information from an ESP32. It is found on GitHub at: https://thelastoutpostworkshop.github.io/ESPConnect/
It includes a number of tools to access information within the ESP32, interacting with a file system implemented on the device, flashing, and more. It is not a programming tool for developing software applications.
ESP32 with Wi-Fi
NO additional software libraries are required to implement the sample code provided with the ESP32. The board manager installs support for the ESP32 which includes many wifi and web server/HTTP functions. If you are running into issues, be sure to consider removing any additional wifi/HTTP related libraries. The various libraries from the various authors are NOT necessarily compatible with each other and experience to date shows that they are, in fact, NOT compatible! They can and will interfere with each other! To remove a library, you simply delete it from your library folder. There is not an IDE user interface tool for that.
A similar caution applies to the many tutorials and YouTube videos - be sure they are compatible with what you are doing!
Getting the MAC Address
Run this code to get the MAC address of the ESP32
Be sure to set the baud rate of your serial monitor to 115200
#include "WiFi.h"

void setup(){
  Serial.begin(115200);

  WiFi.mode(WIFI_MODE_STA);

  Serial.println(WiFi.macAddress());
}

void loop(){}
Connecting to Campus WiFi via WPA2
The ESP board support includes network connection examples. Note that the code for connecting to campus will not work for connecting at home and code that works for home will not work on campus!
You can connect to either the eduroam WiFi network using the "rcsid@rpi.edu" format for the identity, or the rpi_wpa2 WiFi network using just the "rcsid" as the identify. Both require the use of the certificate method.
The Arduino IDE WiFi Tutorial for ESP32:The above has been successfully used on campus as of 10/22/2021 BUT required version 1.0.6 of the ESP32 board support (see above). That sample code does NOT work with version 2.0.6 of the ESP32 board support without a few minor changes. These two lines must be changed from
  esp_wpa2_config_t config = WPA2_CONFIG_INIT_DEFAULT();
  esp_wifi_sta_wpa2_ent_enable(&config);
to
// no longer defined in the header
//  esp_wpa2_config_t config = WPA2_CONFIG_INIT_DEFAULT();
// the function has been changed to not require / accept a parameter
//  esp_wifi_sta_wpa2_ent_enable(&config);
// only need this one line now!
  esp_wifi_sta_wpa2_ent_enable();
You may choose to add a #define for the board support version and then place these lines inside a #ifdef / #elseif / #endif block so that a single code base can be shared within / across a team.
For those using the ESP-IDF approach to software development, the following links may be helpful.- ESP-IDF Tutorial (C code):
- your email for BOTH the EAP_ID and EAP_Identify
- Your RPI password for the EAP_Password
- eduroam for the network name
- Validate Server turned off
The above should be set via the menuconfg tool. Editing the sdkconfig file directly can work, but runs a high risk of an incorrect edit breaking things. Using the menuconfig tool is safer.
Connecting to WiFi via net_reg
USING NET_REG FOR THIS IS NO LONGER SUPPORTED BY CAMPUS! You must use the above method!
The most convenient manner of connecting on campus is to use the above method. If you require an alternative, then this method is your only other alternative.
The following code connects the ESP to the WiFi. For the campus network the password field is left blank. For a home wifi network be sure to use the proper network name and password.
#include "WiFi.h"

const char* ssid ="rpi_netreg";
const char* password = "";

void setup() {
  // put your setup code here, to run once:
  Serial.begin(115200);
  WiFi.begin(ssid, password);

  while(WiFi.status() != WL_CONNECTED){
    delay(500);
    Serial.println("Connecting to WiFi..");
  }

  Serial.println("Connected to the WiFi network");
}

void loop() {
  // put your main code here, to run repeatedly:

}
Accessing a RESTful API
Many IoT applications involve the use of a server with a RESTful API, e.g. Django. This is sample code for using an HTTP GET function for posting to a such a server. Note that depending on the server, you may alternatively need an HTTP POST command. If so, simply use http.POST in the sample below.
if ((WiFi.status() == WL_CONNECTED)) { //Check the current connection status

    HTTPClient http;

    http.begin("http://mdl-vm7.eng.rpi.edu:8080/sensors/1/log?reading=00.02&units=F");

    int httpCode = http.GET();        //Make the request. Might need http.POST() instead depending on server.

    if (httpCode > 0) { //Check for the returning code

      String payload = http.getString();
      Serial.println(httpCode);
      Serial.println(payload);
    }

    else {
      Serial.println("Error on HTTP request");
      WIFI_ERROR = 1;
    }

    http.end(); //Free the resources
  }
Using WebSockets
This section needs more content!
Typically people seem to use the ESP8266 library and follow a specific set of instructions to manually modify that, making it work with the ESP32 since they are extremely similar.
There is apparently a newer sockets library that increases performance and reliability of the connections tho this has not been extensively tested within the Design Lab. There are also suggestions that it may NOT be compatible with some versions of the board manager file, but does work if you change the specific version installed. We do NOT have documentation nor further details at this time. Note that while this may be possibly better, the above one does work.
Using MQTT
The library EspMQTTClient has been successfully used to communicate over the MQTT protocol to a virtual machine or other computer running the MQTT broker (also called server"). Note that an ESP32 that is off campus is unable to communicate to a campus server as support for our VPN is not currently available on the ESP32 platform. For this reason, students should either install the broker on their own computer directly or create a virtual machine on which to run the broker and to perform other software development.
It is possible to publish or subscribe to MQTT topics from a Python program. This is very helpful for experimenting with the use of MQTT and to confirm that things are working before IoT device development is completed. This requires installation of the mosquitto-clients package.
Here is one site that shows an example Python program for this: http://www.steves-internet-guide.com/mosquitto_pub-sub-clients/
Additional Resources
These are some of the helpful resources for using the ESP32 over wi-fi. There are MANY more available as web pages and YouTube videos!
Note that the HTTPClient library is automatically installed when you add the ESP32 board. Note also that the HttpClient library is NOT the same one and is NOT code compatible! Capitalization is different in the two library names!
- https://randomnerdtutorials.com/installing-the-esp32-board-in-arduino-ide-windows-instructions/
- https://randomnerdtutorials.com/esp32-http-get-post-arduino/
Hardware
PCB Protoboard
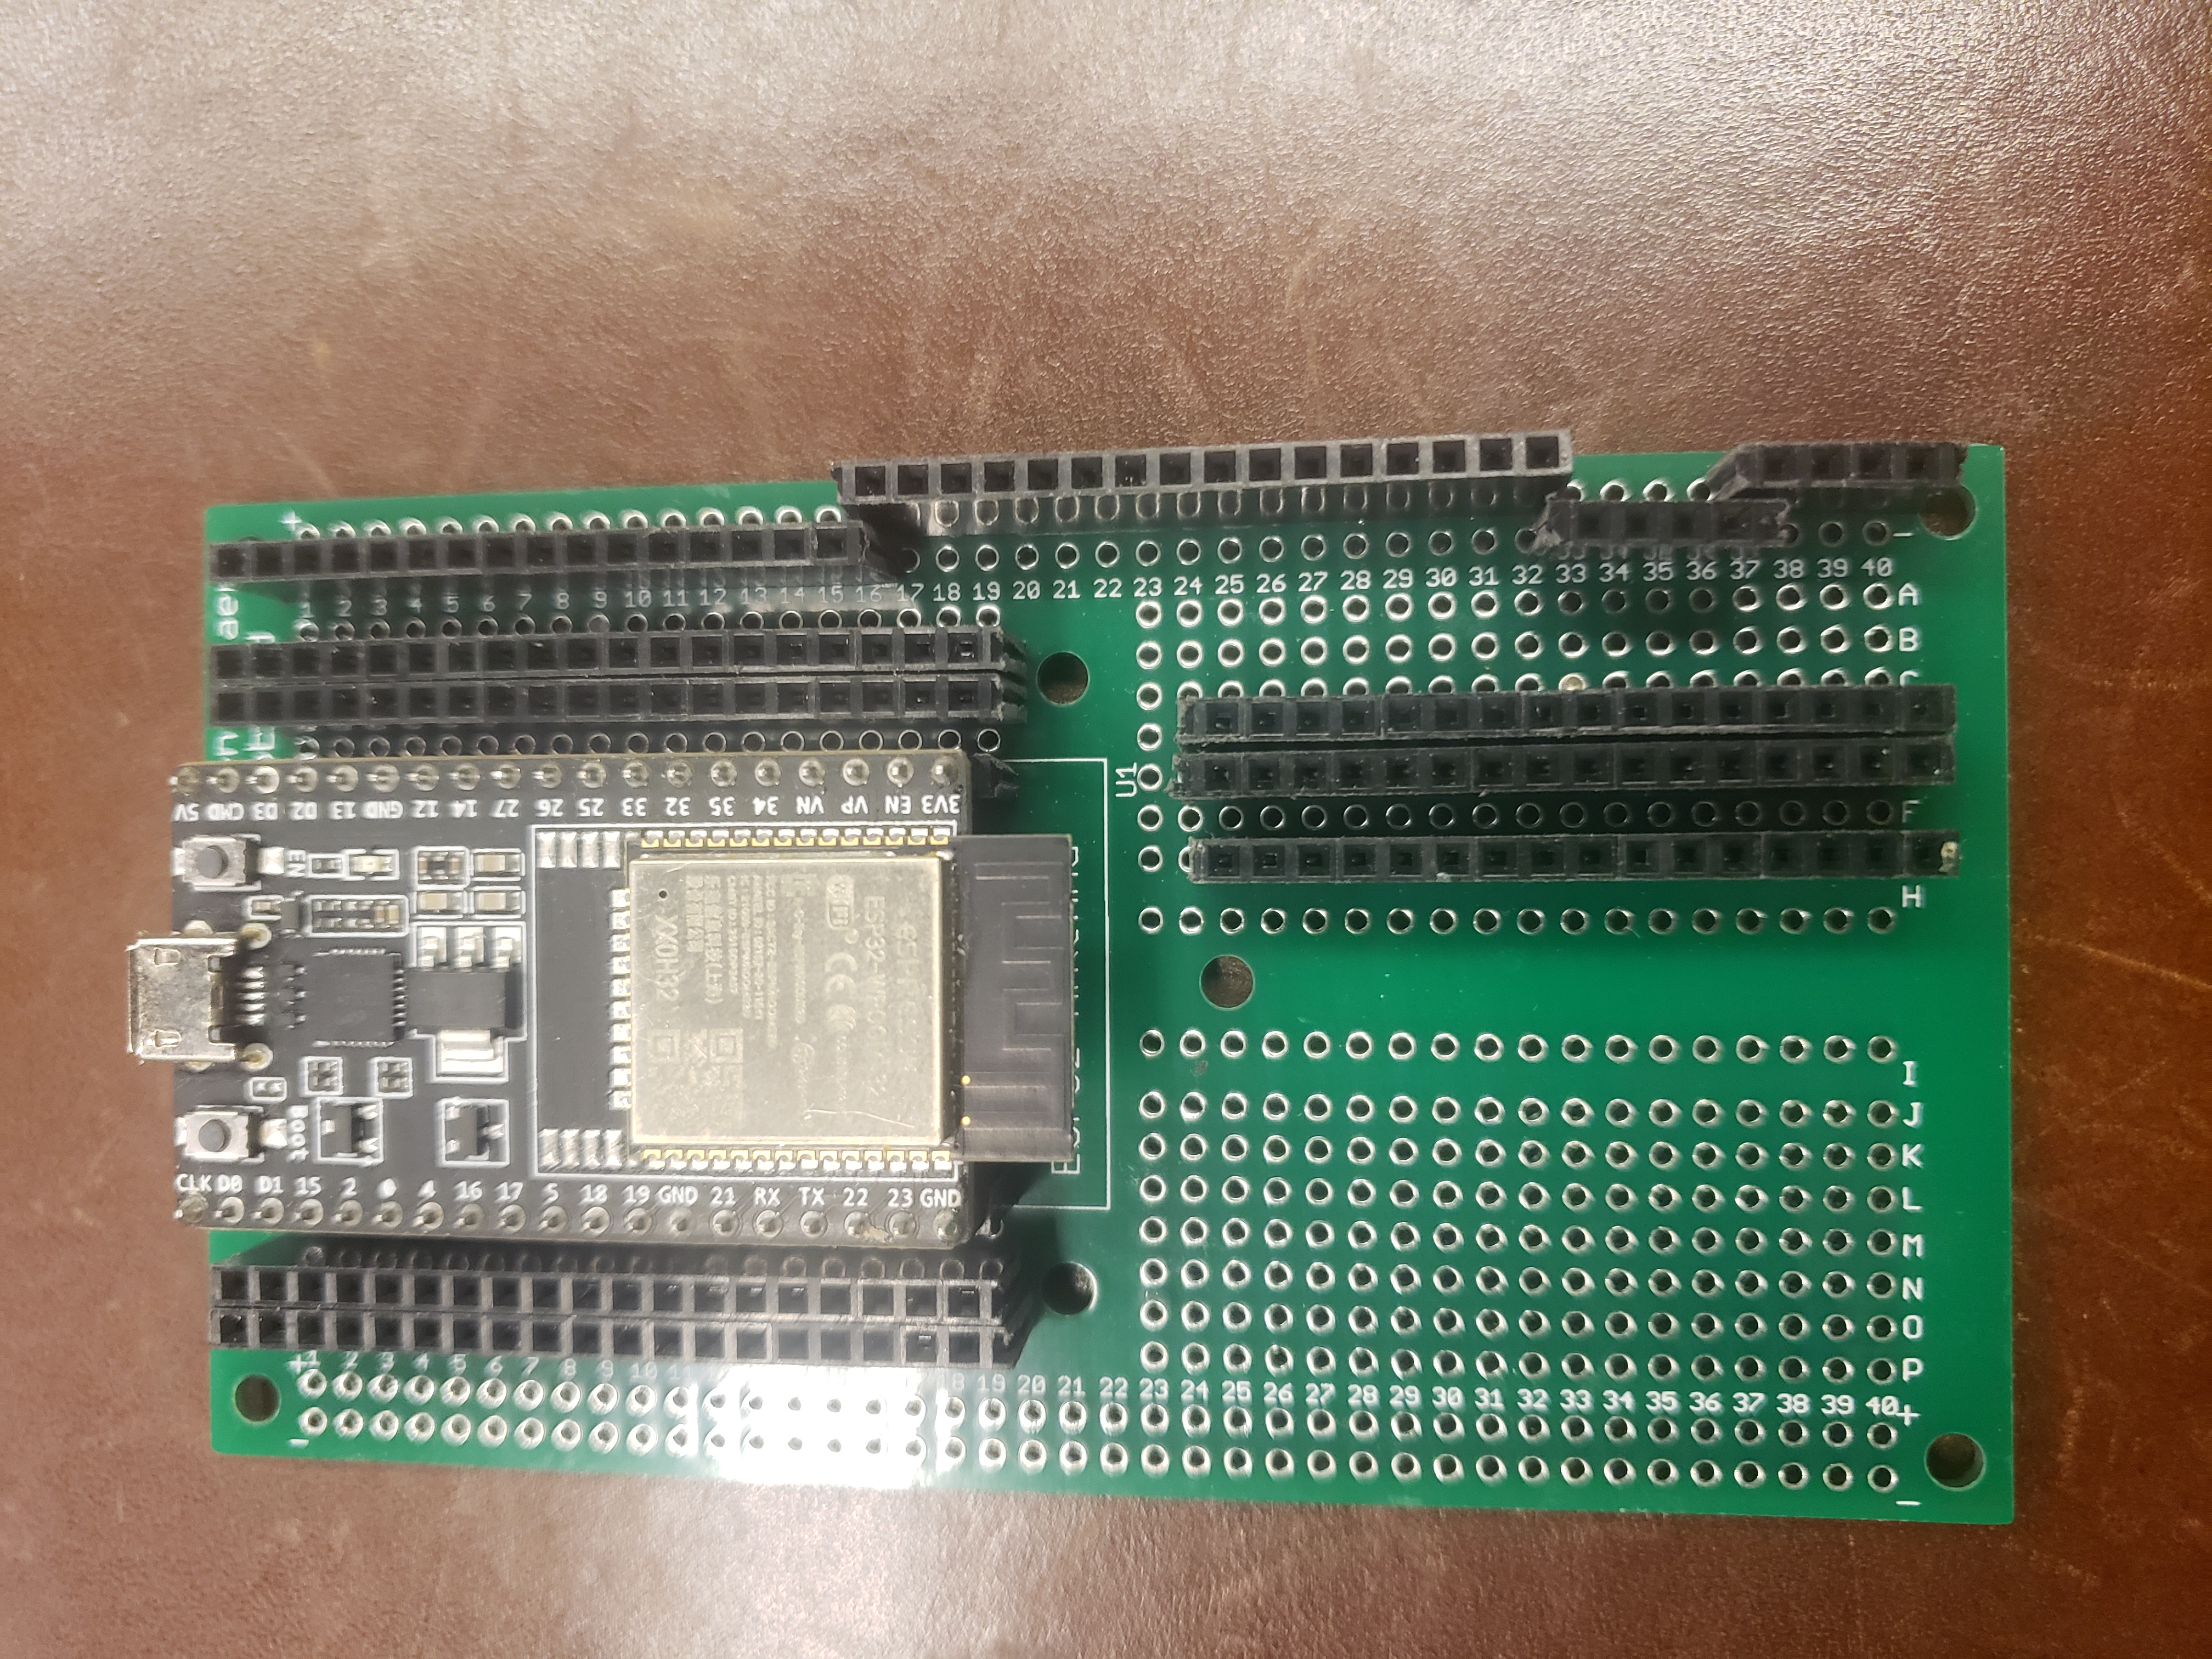
Since the ESP32 does not fit on a standard solderless protoboard, we have designed and fabricated a special PCB to serve as a protoboard for ESP32 projects. This requires that that user solder headers onto the board - one set for the ESP32 itself, then others for power, ground and more to allow using jumper wires to make connections between things. Note the double row of headers adjacent to the ESP32 for extra flexibility - headers are inexpensive!
The user should also add nylon #4 screws and nuts to the corners to serve as feet, so that the board does not short out when placed on a surface.
The headers can be placed as needed, but the photo shows a typical working configuration.
The board is 2.5" x 4.5" overall.
Serial Communications Not Working
You may need to find/download the appropriate driver for your ESP32 development kit. For the SI Labs CP201X interface, this is the driver download page: https://www.silabs.com/developers/usb-to-uart-bridge-vcp-drivers
Hardware Reset
This page has instructions to avoid needing to manually press the reset button in order to download updated code to the ESP32: https://randomnerdtutorials.com/solved-failed-to-connect-to-esp32-timed-out-waiting-for-packet-header/
Please DO NOT solder ANYTHING to the Design Lab ESP32 boards other than header pins! Instead, just add that capacitor to your protoboard! If your loaner board already HAS the capacitor, it was installed by one of the Design Lab staff and should not be removed.
You may solder things to our custom green protoboards!
EagleCAD (Obsolete!)
This website has a library for the Devkitc-v4 version of the board: https://www.snapeda.com/parts/ESP32-DEVKITC-32D/Espressif%20Systems/view-part/
EagleCAD has been declared obsolete by AutoCAD as they have moved to providing Fusion.
KiCAD
Since Autodesk has stopped developing / supporting Eagle, our preferred schematic program is KiCAD.
Espressif has published libraries for the ESP32 here: https://github.com/espressif/kicad-libraries
Be sure to use the symbol for the ESP32-devkitC and NOT for the chip itself!
Pin Usage
Note that unlike an Arduino, microprocessors like the ESP32 and the STM32 family have pins that can be configured for different and conflicting purposes! This can get confusing and cause unexpected behavior. In some instances, if you accidentally attempt to use a pin for two different conflicting purposes, it may seem like your project is "working". Since this violates the ESP32's documentation, it is not guaranteed to continue to work and may eventually cause unexpected issues.
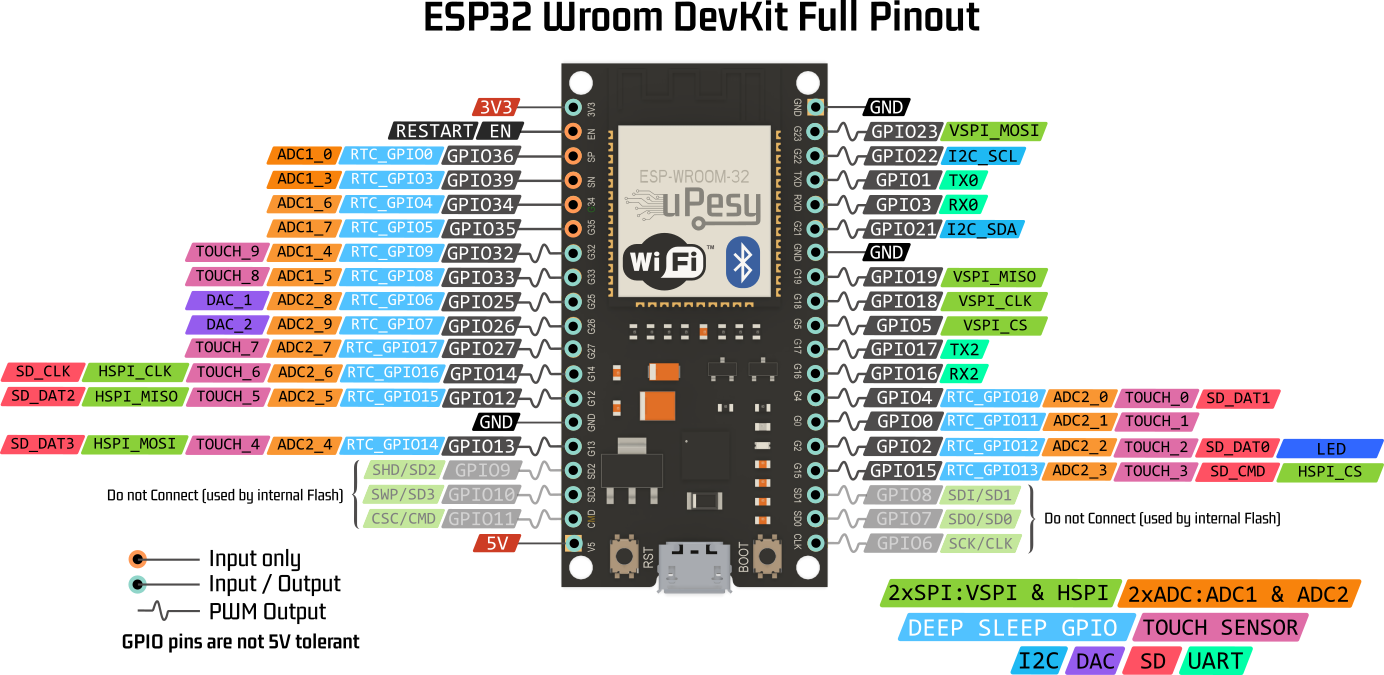
For example, GPIO19 is also labeled as VSPI_MISO. As such it can EITHER be configured as part of an SPI bus OR it can be configured as a generic digital input or output pin but it cannot be used for both at the same time. This can make it challenging to assign pins! Note that there are also some pins on on some devkit boards that have pins reserved for internal ESP32 usage by it's flash memory. These should be clearly shown on a pinout diagram. For the DevkitV1-C, these are pins GPIO6-GPIO11.
Note that the Arduino IDE, unfortunately, does NOT warn nor prevent you from creating such a pin conflict!
Pin-out Diagrams
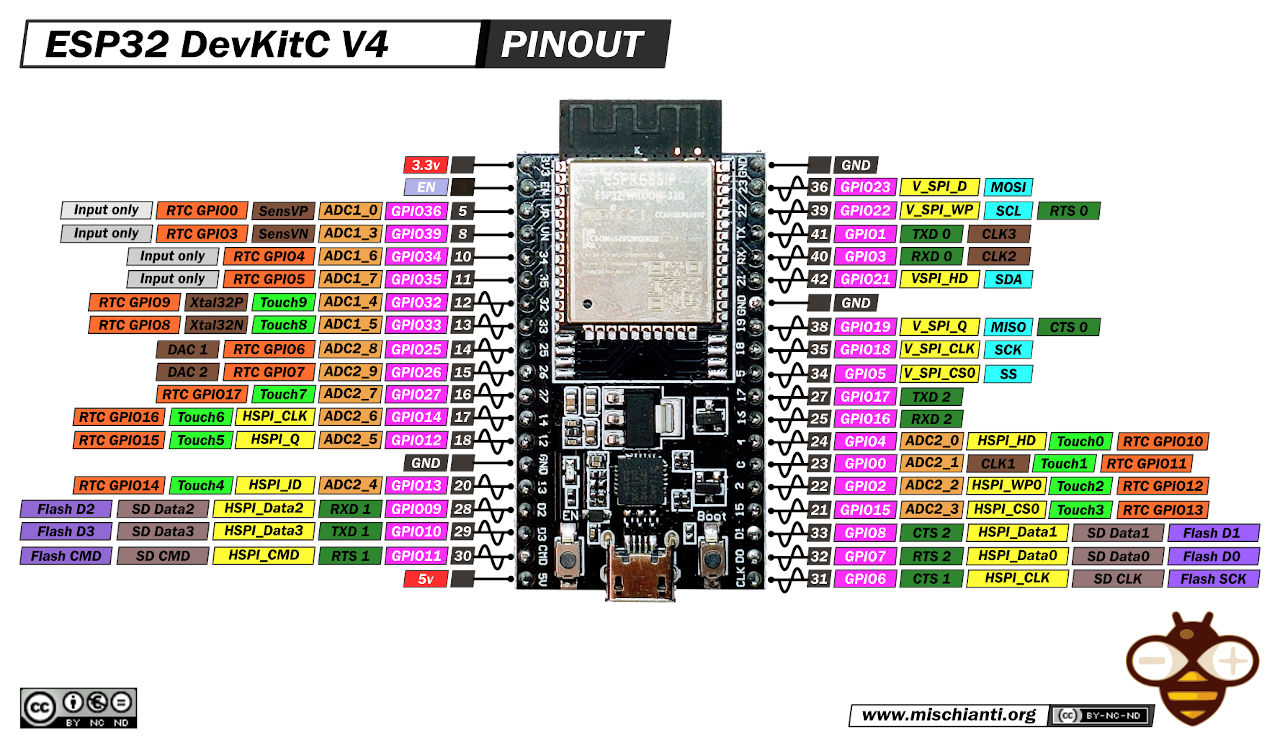
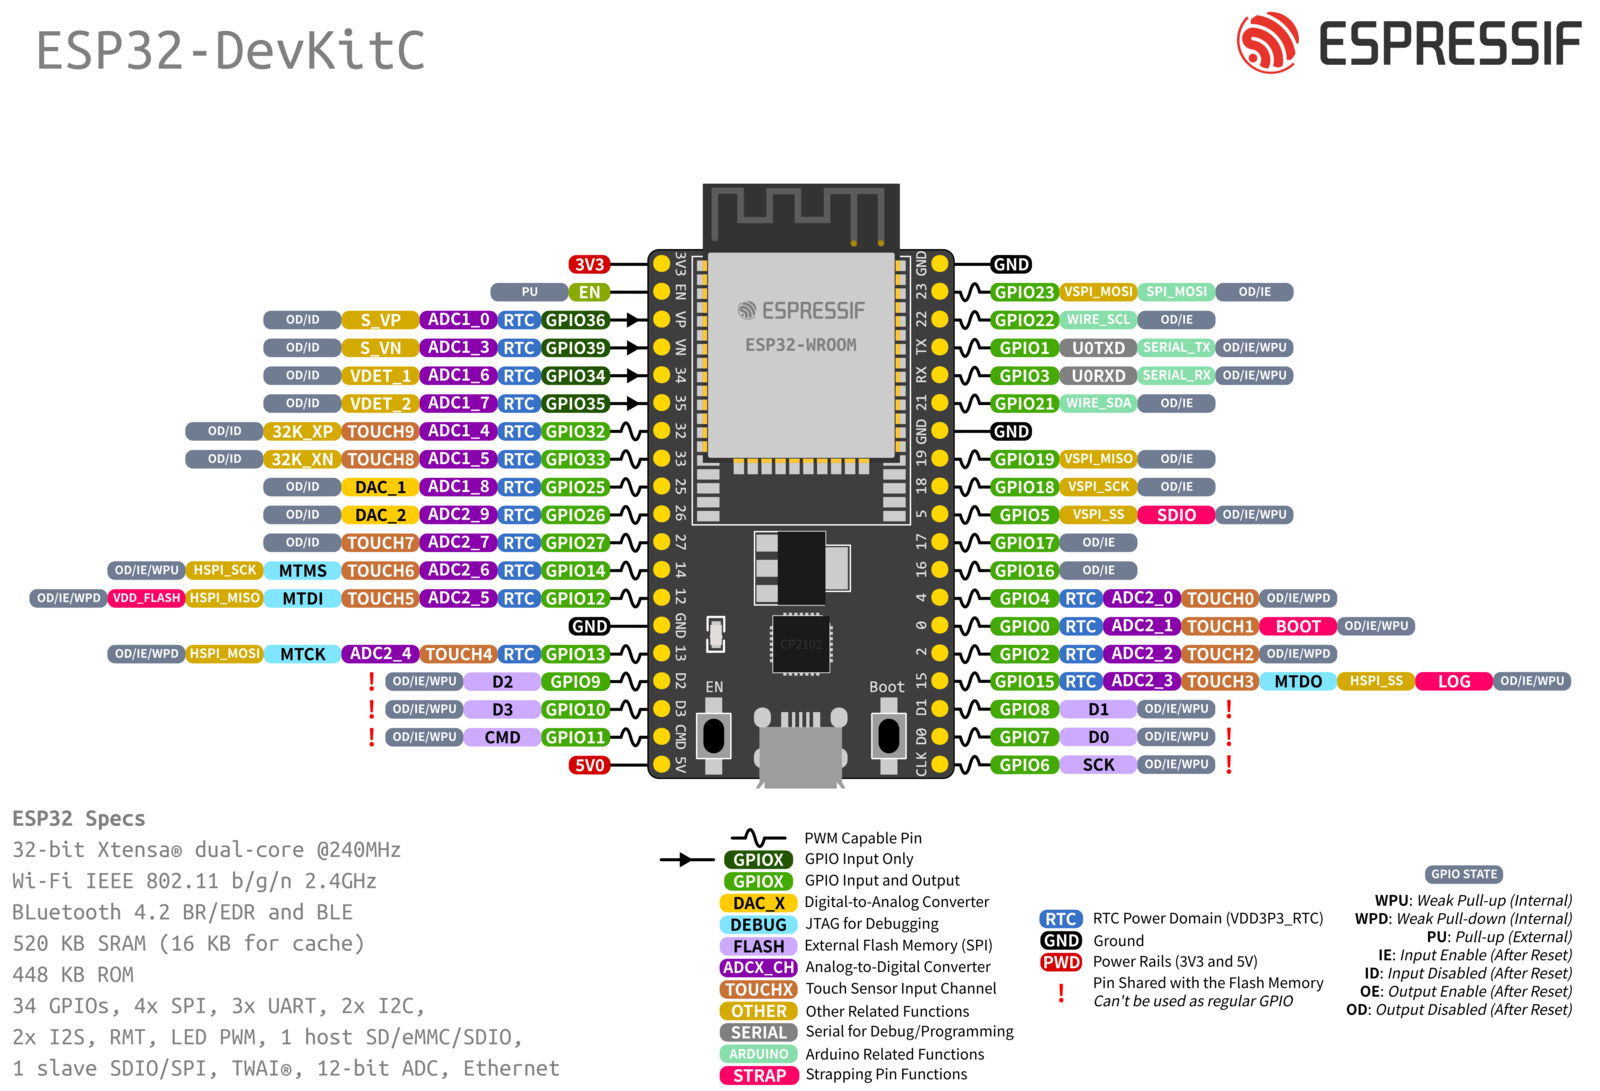
Be sure to confirm that you have the correct diagram for YOUR BOARD! Watch especially for differences between the WROVER and WROOM based boards.
There pin-out diagrams at:- https://www.upesy.com/cdn/shop/files/doc-esp32-pinout-reference-wroom-devkit.png
- https://mischianti.org/wp-content/uploads/2021/07/ESP32-DEV-KIT-DevKitC-v4-pinout-mischianti.jpg
- https://docs.espressif.com/projects/esp-idf/en/v5.1.3/esp32/_images/esp32-devkitC-v4-pinout.png
If your ESP32 continually reboots or will not accept programming, remove it from your circuit and try again. If it works, then you have most likely used a restricted pin.
Internal-pull up / pull down Resistors
The following pins supports internal-pull up resistors and so may be used for push button switches without an external resistor:
- GPIO2 (often labeled as "D2" on development boards) - Supports both internal pull-up and pull-down resistors.
- GPIO4 (often labeled as "D4" on development boards) - Supports both internal pull-up and pull-down resistors.
- GPIO5 (often labeled as "D5" on development boards) - Supports both internal pull-up and pull-down resistors.
- GPIO12 (often labeled as "D12" on development boards) - Supports both internal pull-up and pull-down resistors.
- GPIO13 (often labeled as "D13" on development boards) - Supports both internal pull-up and pull-down resistors.
- GPIO14 (often labeled as "D14" on development boards) - Supports both internal pull-up and pull-down resistors.
- GPIO15 (often labeled as "D15" on development boards) - Supports both internal pull-up and pull-down resistors.
- GPIO25 - Supports internal pull-up resistor.
- GPIO26 - Supports internal pull-up resistor.
- GPIO27 - Supports internal pull-up resistor.
Other GPIO pins will require external resistors.
Using a Virtual Machine as the Server for IoT
Information on how to configure your virtual machine to support using it as the server to communicate to the ESP32 can be found on the VirtualBox page.
Commercial Offerings
The ESP32 has proved to be widely accepted and is now being packaged in many configurations beyond the DevKits. A google search will reveal many of these alternatives.
ESP32 Dual Core with Arduino IDE
ESP32 series have both dual core, such as ES-WROOM-32, and single core, ESP32-SOLO-1, products. The following tutorials explain how you use two cores.
- How to use ESP32 Dual Core with Arduino IDE
- ESP32 Dual Core Programming with Arduino IDE
- ESP32 Dual Core with FreeRTOS and Arduino IDE
- RTOS video tutorials by Digikey: https://www.youtube.com/watch?v=F321087yYy4&list=PLEBQazB0HUyQ4hAPU1cJED6t3DU0h34bz
- Part 12 covers multicore systems: https://www.youtube.com/watch?v=LPSHUcH5aQc&list=PLEBQazB0HUyQ4hAPU1cJED6t3DU0h34bz&index=12
- Introduction to RTOS